Since I’ve built a free-standing greenhouse in my backyard, my green-thumb friends told me they wanted to build a similar all-season greenhouse, if only they had more space in their yard.
If you don’t want to cover your veggie patch with plastic sheets and hoops every year, you need a more permanent solution.
Something that takes much less space, offers plenty of growing options, and comes with a bucketful of benefits.
You need a lean-to greenhouse.
This spring, I helped my dear friend Trish build a lean-to greenhouse that is not only functional but pleasing to look at.
Here’s how we’ve done it.
What Is a Lean-to Greenhouse?
A lean-to greenhouse is a greenhouse you can build against a garden wall or the side of another building.
This means that the greenhouse shares one wall with another structure, which can be your home, garage or garden shed.
Besides saving materials, this arrangement comes with many advantages → please check the next section.
As the materials are concerned, you can use pretty much the same glazing and structure as if you’re building a regular greenhouse.
You can have a separate door on the outside, or connect the lean-to greenhouse with your house by using the backdoor to enter it.
If your house has a backdoor, this is a very interesting option as it lets you:
- Get to your plants directly from the warmth of your home — priceless in bad weather
- Reduce the heat loss from both your home and the greenhouse
- Convert the lean-to greenhouse into a lush and comfy sunroom
A lean-to greenhouse is a perfect choice if you can spare a sunny side of your house or backyard wall.
It’s also a great option if the center stage is already taken by another landscaping feature, such as a woodland garden or a rustic outdoor kitchen/dining space.

Why Should You Consider a Lean-to Greenhouse?
A lean-to greenhouse has many advantages over a free-standing construction. Here’s why you should consider building one.
Perfect for Small Backyards
A free-standing greenhouse can easily take the center stage in your small backyard, making it even smaller. Wherever you put it, you’ll always feel that it’s standing in the way.
This is not the case with a lean-to greenhouse. If you select a sunny outside wall, a lean-to house can be as efficient as a regular greenhouse with all four glazed sides.
The south side would be ideal, but the southeast will do as well, as it gives you the most of the sun from November to February.
More Value for the Cash
Since you only need to glaze it from three sides, you need less glass, polycarbonate, acrylic, or whichever material you choose for the roof and siding.
Effectively, you get pretty much the same amount of useful space for less money.
Instead, you can divert these savings into buying other gardening needs.
More Vertical Space
As your greenhouse literally “leans to” another structure, you can use the back wall to attach more serious shelving.
In theory, you can build it as tall as the back wall. If you really want to make the most bang for the buck, you can even make shelves so high you need a ladder to reach them.
Easy Access to Water and Electricity
When I was building a free-standing greenhouse back at my place, it took me some time to figure out the least disruptive but also the safest way to bring water and electricity to the far end of my backyard.
While building a lean-to greenhouse at Trish’s place, we had no such troubles. We smartly used the existing garden water faucet and just hooked up the drip irrigation hose.
Extra Weatherproof
Again, since the lean-to greenhouse is protected by a building on one side, it’s much less vulnerable to storms.
It also retains heat better in cold months, while in summer months the extra heat can even cause a problem unless you keep the ventilation panes open.
8 Steps to Build a Lean-to Greenhouse?
Step 1: Find a Plan and Modify It
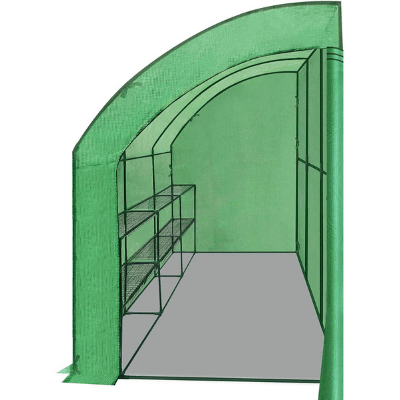
While browsing through different lean-to greenhouse plans she found online, my friend Trish noticed a big downside almost every lean-to greenhouse had — the narrow walkway that takes up half the inside space.
She wanted to maximize the growing space so I suggested we build one without!
We agreed that the best place for her greenhouse was the south wall of a covered patio she uses to get to her backyard.
With the addition of three windows on the patio wall, Trish wanted easy access to the shelves from inside the patio. This arrangement made my job much easier, as I didn’t have to make the outside door.
Step 2: Set Aside the Materials
Although my material of choice would be aluminum, I had to agree with Trish that wood would agree much nicer with her cottage-style home. Yes, we eventually painted the frame white.
So, this is what we used.
Wood:
1×10 barn board siding
2x4s for the lean-to frame
¾-inch plywood for the tabletop and gusset plates
1x2s for window trims
Fasteners:
Rust-resistant deck screws
Old Bricks: For the base floor
As required
Glazing:
(8) 24” x 48” UV resistant acrylic panels, clear
Initially, Trish wanted me to use glass to go with her rustic home, but luckily, I managed to talk her out of it.
Not only because it would make the whole glazing procedure more demanding, but also because clear acrylic is much tougher than glass while looking exactly the same.
If you get a UV-treated product, it won’t turn yellow over the years, and you don’t have to worry about hail or a falling branch.
I chose acrylic that is resistant to long-time sun exposure and with 92% light transmission.
Acrylic was the most expensive part of this lean-to greenhouse project. If you’re on a tight budget, you can go with 24” x 12’ polycarbonate sheets.
Polycarbonate is tougher even than acrylic but contains water-soluble toxins such as BPA. This is why I can’t recommend it for a veggie greenhouse.

Step 3: Round up the Trusty Tools
Here’s what I used —
- Circular saw
- Jigsaw
- Miter saw
- Cordless drill
- Angle finder tool, carpenter’s square, level
- (3) old wood windows
- Paint remover
- Primer, paint, caulk
- Carpenter pencil, measuring tape
Step 4: Prepare the Lean-to Wall
As we wanted to be able to access the plants from the inside of the patio, we needed windows on the back wall. Trish found three old wood windows on a garage sale and we decided to use these.
I stripped the old paint, caulked them, primed, and printed them to fit into the general theme of the patio.
I framed them so they could close pretty snugly. This will hopefully improve the heat retention in winter, but also allow Trish to ventilate the greenhouse when it becomes too stuffy inside.
The rest of her covered patio remains open to the backyard, which is both good and bad:
Step 5: Build the Base
With windows in place, the next thing to build was the base. For this, I chose to make an empty box out of barn board siding with a plywood tabletop. Remember, as we eliminated the walkway, the box was to take a whole footprint of the lean-to.
Trish wanted to be able to reach the planters from inside the patio, so I didn’t want to make it wider than 3 feet. Not to say that if we went any deeper, the greenhouse would’ve taken too much space from the pathway outside the patio.
It took some figuring out how to make the box level and square, as the patio wall dropped a few inches from one end to the other.
Make sure you have your level and angle finder close at hand, as you don’t want to mess it up at this stage.
I used the circular saw to split the 2x4s lengthwise so that I ended up with 2x2s. My job was so much easier as I used this circular saw guide from Kreg. I can warmly recommend it.
The 2×2 went into the base frame pillars, the three of which I screwed into the patio wall.
Then, we installed the barn siding using rust-resistant screws.
For cutting out the plywood tabletop, there’s no better tool than a jigsaw. Instead of leaving the bare dirt, we paved the base floor with old bricks.
Although the base box is empty for now, Trish plans to use it as a storage space in the future — for plant pots, bags of potting mix, gardening tools, etc.
And we don’t want these lying around in the dirt, do we?
Step 6: Raise the Frame
We wanted more vertical space so the roof frame doesn’t angle straight from the base edge. I suggested we leave at least one foot of clear vertical space and slope the roof from there.
I started by making a raised ledge that framed the tabletop on all three sides. This is where I nestled the trusses.
In the end, we had seven trusses that extended from the base 1 foot vertically and then sloped 3 feet to the patio wall at a 45-degree angle.
I used 2x4s for both the ledge and the trusses.
Each truss consisted of two 2x4s and a connector piece made from a 2×4 board. You may want to use a more elegant solution, but when you add the acrylic panels, these gussets are barely noticeable.
If you’re a skilled woodworker, you may do without, but I strongly recommend you use a miter saw for cutting the truss joints. When the base and frame were done I decided to primer and paint the wood. If you want a more natural look, you can stain it instead.
This proved to be a smart decision, as it would be almost impossible to paint the structure when I installed the glazing.
Step 7: Install the Glazing
Compared to regular glass, UV-treated acrylic panels are lightweight and easy to install.
We chose to use EVA foam ridgeways along the support beams. This acts as additional insulation and damping between the acrylic and wood.
I decided to drill a hole for roofing screws at roughly every half-foot of the panel length. Be careful while drilling acrylic and set your drill speed to slow.
Make sure to use roofing screws with rubber washers, as instructed.
As the side ends are concerned, after some thinking, we thought it was best to close off the triangular part entirely with wood and use acrylic for the square part. This way, the plants can benefit from the sideline exposure as well.
Step 8: Set up the Greenhouse
In the first place, my friend wanted this greenhouse to grow winter veggies, such as salad greens, spinach, Brussel sprouts, cherry tomatoes, chilly peppers, and spring onions.
For this purpose, we bought several large plastic bins. As a life hack, you can use the lids as drip catchers, provided you drill a couple of holes in each bin.
Whether you will add some wire shelves is totally up to you. We also added a few smaller planting pots to spice up the mix.
The benefit of using sturdy 2x4s instead of aluminum for the frame is that now Trish can also hang several pots from the trusses, increasing the greenhouse capacity without taking any space from the tabletop.
5 Best Lean-to Greenhouse Kits You Can BUY
1. EAGLE PEAK 6.6’ x 3.3’ x 6.9’ Outdoor Lean-to Greenhouse
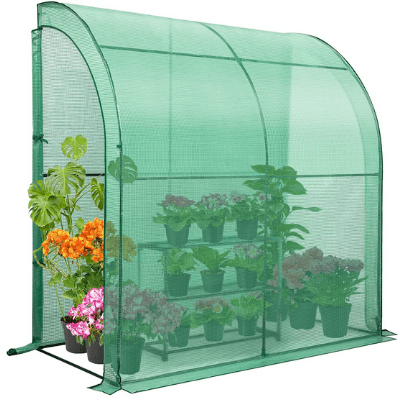
The durable powder-coated steel frame is reason enough to draw your attention to the EAGLE PEAK walk-in lean-to greenhouse.
Thanks to the water-resistant, UV-treated PE cover, all the heat and humidity stay inside.
This allows you to extend the growing season well into the cold months.
I like the zip-up doors. Not only does this stop your cat from sneaking inside and messing up your plants, but acts as a 100% eco-friendly pest control.
As a nice added bonus, you get a 3 tier flower rack with wire mesh shelves.
The PE cover extends a few inches on the bottom, so you can put weights on it to improve stability, or cover it with mulch.
The EAGLE PEAK comes with ropes and ground stakes, you can use it as a free-standing greenhouse, but also fix it to a wall or another structure.
Pros
Cons
- Powder-coated steel frame
- UV-resistant cover
- 3 tier planter rack
- Zippered door
- Seams appear weak in some places
- No ventilation windows
2. Aoodor Walk-in Lean to Wall Greenhouse
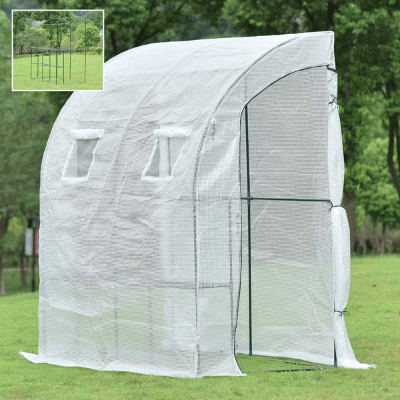
Another lean-to greenhouse kit that follows the half-arch shape, the Aoodor Walk-in Greenhouse is very much similar to the Eagle Peak Greenhouse.
However, there are a few key differences, so you might prefer this one instead.
This lean-to greenhouse also uses a heavy-duty powdered steel frame. Now, if you’re building one yourself, I’d always tell you to make an aluminum lean-to greenhouse.
However, if you’re going for a lean-to greenhouse kit, steel is the way to go.
These greenhouses don’t use a foundation and every extra pound makes the whole thing more stable.
Also, this greenhouse kit has a 2 tier shelf that is made part of the construction itself. I like this solution better than a free-standing shelf as it gives me more space to work inside.
As the final touch, this lean-to greenhouse comes with two roll-up windows so you can keep the door closed even when you want to reduce the humidity inside.
Pros
Cons
- UV-resistant cover
- Zippered door
- Built-in planter rack
- Roll-up windows
- The cover fits loosely and looks cheap
3. Strong Camel New Large Walk-in Wall Greenhouse
The largest of the bunch, the Strong Camel Walk-in Greenhouse offers plenty of space for you to tend to your plants.
If you lack the skills or time to build a greenhouse yourself, this Strong Camel can lean against any sun-facing wall or structure in your backyard.
Covered in durable UV-protected PE cover, the greenhouse protects your veggies and seedlings from birds and creepy crawlies.
I really enjoyed assembling this greenhouse as the kit comes with several dozen PVC fittings.
One thing I love about this lean-to greenhouse is the beautiful green color of the PU cover.
Set it up in the far end of your backyard, and the whole structure will blend in with the surroundings. No one will even know you have a greenhouse.
Due to the large floor space, this lean-to greenhouse kit offers the most room for customization.
Pros
Cons
- Powder-coated steel frame
- UV-resistant cover
- 3 tier planter rack
- Zippered door
- No ventilation windows
- Can’t keep the entrance open
4. MCombo Greenhouse Wooden Cold Frame Greenhouse
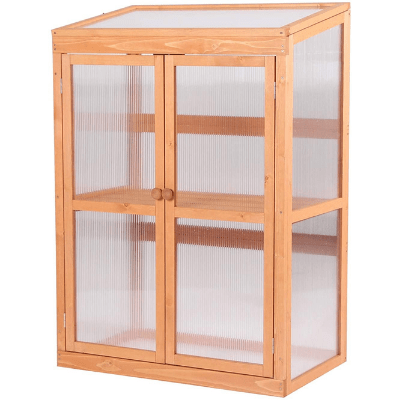
The MCombo Wooden Cold Frame is a lean-to greenhouse you fall in love with at the first sight.
The frame is beautifully assembled from fir wood which isn’t only visually appealing but also sturdy and durable.
You can stain it or paint it before the assembly so it better fits your interior or exterior. Yes, this lean-to greenhouse is small enough to be used inside.
The level of adjustment this small lean-to greenhouse offers is unbelievable. Using the five pressed screw holes, you can adjust the shelf height to make room for taller plants.
You can even drill more holes to lower or raise the shelf even more.
Unlike the semi-rigid greenhouses with steel frames, this greenhouse doesn’t use a PU tarp as a cover.
Instead, it is glazed with transparent polycarbonate covers that give you maximum light transmission while retaining maximum heat.
Thanks to this, you can use the MCombo for sprouting well into the cold season.
And just when you thought that’s all, you realize that this greenhouse has a roof that you can prop open — useful for inspecting your plants and reducing the humidity.
Pros
Cons
- Built to last
- Polycarbonate panels
- Adjustable shelf height
- Too small for serious gardening
- The wooden frame needs protecting against the elements
5. Palram HG5548 Hybrid Lean-to Greenhouse

Last but definitely not least, the Palram HG5548 Hybrid Greenhouse is where things get serious.
With the Palram, you don’t have to worry about hail or falling branches, thanks to virtually unbreakable 4 mm thick double-wall polycarbonate glazing.
The polycarbonate they used in this greenhouse blocks up to 99.9% of UV rays, while letting in 90% of sunlight.
If you don’t want to risk losing all your veggies to a sudden storm, this is a lean-to greenhouse kit for you.
The rust-resistant aluminum frame is a guarantee that this greenhouse will stand the test of time.
This greenhouse definitely beats the competition in the extras department: it comes with an adjustable roof vent, rain gutters, and hinged doors with a magnetic catch you can actually lock.
The only drawback is the price. The cost of this greenhouse is almost 10 times more than any of the competitors on this list.
For that kind of price, you can as well hire someone to build you a greenhouse to your specifications.
Pros
Cons
- Sturdy aluminum frame
- Thick UV-resistant polycarbonate panels
- Roof vent
- Rain gutters
- Magnetic door catch
- Lockable
- Very expensive
- Takes some know-how to put together
Final Thoughts
A lean-to greenhouse offers many advantages over a regular, free-standing design.
First of all, it costs less to make for about the same amount of useful space.
Since it leans to a solid structure wall, this greenhouse type is more resistant to extreme weather.
Thanks to the solid back wall, a lean-to greenhouse retains heat more efficiently — sometimes to a point you need to keep the vents open at all times.
Finally, if you build it against a backyard patio, you don’t even have to step outside to pick tasty tomatoes and greens for your breakfast.